Building Dalamud
This guide covers building Dalamud from source, and is intended for people who are making changes to Dalamud itself.
If you're just looking to create plugins, you don't need to follow this guide! You can skip this section and head over to the Plugin Development section.
Dalamud's managed projects are built with the .NET SDK, and its native (C++) projects with CMake. This guide will walk you through setting up your development environment and building Dalamud.
Prerequisites
- Windows 10/Windows Server 2016 or higher
- Visual Studio 2026
- Both the "Desktop Development with C++" and "Desktop Development with .NET" workloads are required.
- The native projects use the v143 (Visual Studio 2022) toolset. In the Visual Studio Installer, add the "MSVC v143 - VS 2022 C++ x64/x86 build tools" component.
- We generally work with the latest versions of Visual Studio and MSVC. If you are seeing build errors in generators or C++ projects, even if you use Rider or another IDE, make sure that Visual Studio is fully up to date.
- .NET 10.0 SDK
- This is included with Visual Studio 2026, but you can also install it separately if desired.
- CMake 4.0 or newer, available on your
PATH- Alternatively, add the "C++ CMake tools for Windows" component in the Visual
Studio 2026 installer. The build scripts use it when no CMake is on your
PATH.
- Alternatively, add the "C++ CMake tools for Windows" component in the Visual
Studio 2026 installer. The build scripts use it when no CMake is on your
- Git
Getting the Source
Dalamud's source code is hosted on GitHub. You can clone the repository using the following command:
git clone --recursive https://github.com/goatcorp/Dalamud.git
Dalamud has several Git submodules. If you don't clone the repository with the
--recursive flag, you'll need to initialize the submodules manually using the
following command:
git submodule update --init --recursive
You can also use this command later to update the submodules in your local repository.
Building
In a terminal, navigate to the root of the repository and run the following command:
.\build.cmd
This generates the native projects, then builds Dalamud and all of its
components (including the injector). Pass Release to build the release
configuration instead of Debug.
Working in an IDE
The native projects are generated by CMake and are not checked in. Before
opening Dalamud.slnx for the first time, run:
.\generate.cmd
This writes the native projects to build\, where Dalamud.slnx loads them
from. Until then, they show up as unloaded. Changes to the CMakeLists.txt
files are picked up automatically on the next build.
generate.cmd picks the newest installed Visual Studio. To choose one
explicitly, pass vs2026 or vs2022. When switching between them, delete the
build\ folder first.
Building on other operating systems is not supported at this time, due to native components (such as the injector) that rely on Windows APIs.
However, you may succeed with a partial build on Linux/macOS by building the
Dalamud project directly with dotnet build Dalamud/Dalamud.csproj.
Running
If you use these instructions to bypass the disabling of Dalamud after game patches, you are on your own!
We disable Dalamud on every patch until it is verified to work in a somewhat stable and safe manner. If you choose to ignore this, you will experience crashes and other issues, and we will not help you.
Once again: manual injection of Dalamud into a running game is for developers only! If you want to help us test Dalamud and plugins after a patch, please join the Discord and pick up the tester role. We will ping you when we need help.
The build process will output the injector to bin\Debug\Dalamud.Injector.exe.
For testing purposes, you can use this injector in a few different ways.
Fake Launch
If you want to test Dalamud without fully logging into the game, you can use the "fake launch" feature of the injector. This will launch the game, but without any authentication, so you won't be able to go any further than the title screen.
To use this feature, you should ensure the game is not running, then run the injector with the following arguments:
.\Dalamud.Injector.exe launch -f
If your game is installed in a non-standard location, you must use the -g
argument to pass the full path to ffxiv_dx11.exe, e.g.:
.\Dalamud.Injector.exe launch -f -g "D:\dev\ffxiv\game-root\game\ffxiv_dx11.exe"
Manual Injection
To test Dalamud fully, you'll need to inject it into a running game. To do this, you will need to ensure that you start the game in a method that disables its ACL protections. Launching through the official launcher will not allow you to inject Dalamud.
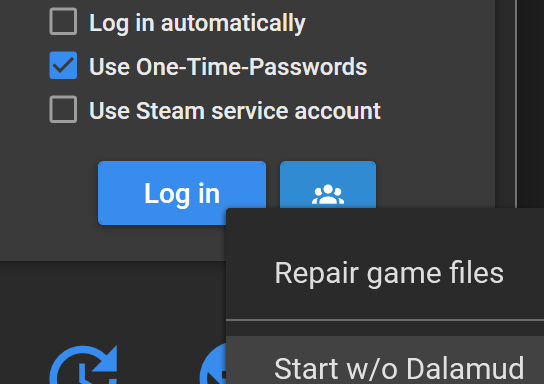
XIVLauncher is the recommended method for this, as it will automatically disable the ACL protections for you. Simply launch the game through XIVLauncher, making sure to disable Dalamud injection, using one of the following options:
- Right-click the "Log in" button, and select "Start w/o Dalamud".
- Disable Dalamud in the XIVLauncher settings.
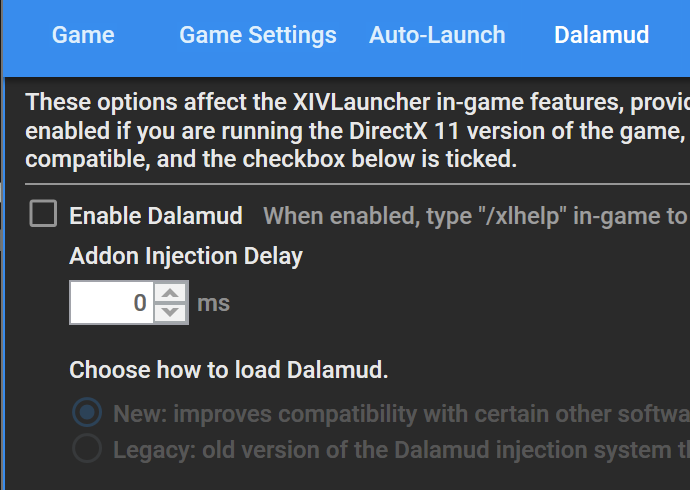
Once the game is running, you can run the injector with the following arguments:
.\Dalamud.Injector.exe inject -a
Dalamud should now be injected into the game. You can verify this by looking for the Dalamud logo in the top-left corner of the screen (assuming you haven't yet logged in).
You can invoke the injector with help to see all available arguments:
.\Dalamud.Injector.exe help
Most of the extra arguments will not be helpful, but they are lightly documented in the help output for completeness.